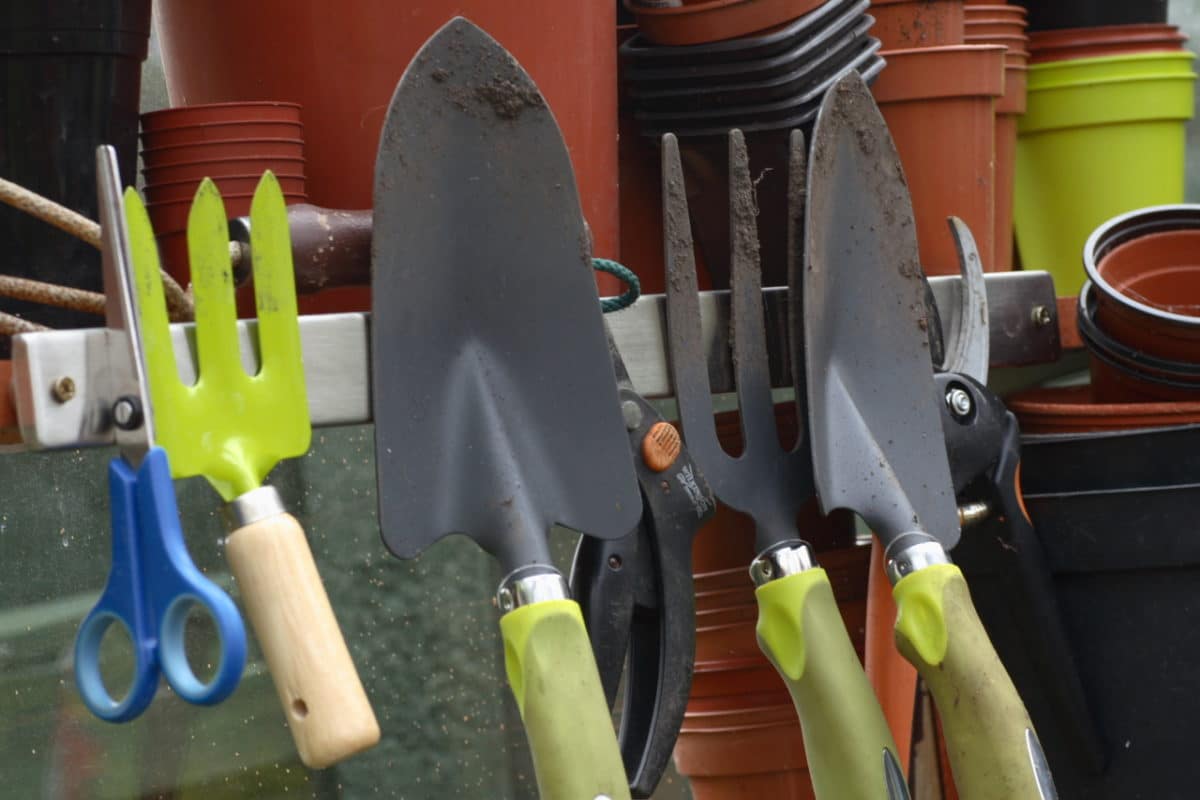
Categories
Home & Garden

Growing Cherry Tomatoes in Pots: Delicious Tomatoes from a Container

Cherry tomatoes are one of the most rewarding crops you can grow — and you don’t need a garden to do it. A single well-managed pot on a sunny balcony, patio, or deck can yield hundreds of sweet, bite-sized tomatoes from early summer right through to fall. Growing cherry tomatoes in pots is beginner-friendly, surprisingly productive, and genuinely fun once you know the right variety to choose and the handful of care habits that make the difference between a thriving plant and a struggling one.

This complete guide covers everything — from picking the right container and soil mix, to the best cherry tomato varieties for pots, watering schedules, support structures, and how to troubleshoot common problems. Whether you’re working with a fire escape, a small backyard, or just a sunny kitchen window, you can grow excellent cherry tomatoes in containers.

Categories
Homesteading

How to Start a Homestead: Step-by-Step Beginner’s Guide

There’s something deeply satisfying about growing your own food, raising animals, and becoming less dependent on grocery stores and utility companies. Homesteading — the practice of creating a more self-sufficient life from your own property — is one of the most rewarding paths an American family can take. But getting started can feel overwhelming when you’re staring at a blank yard and a long list of skills you don’t yet have.

This guide walks you through exactly how to start a homestead, step by step — whether you’re working with a quarter-acre suburban lot or dreaming about a 10-acre spread in the country. We’ll cover what homesteading really means, how much land you actually need, what to tackle first, and how to avoid the burnout that trips up so many beginners.

Categories
Home & Garden

How to Grow Plants from Cuttings

Growing plants from cuttings is one of the most rewarding skills any homesteader or home gardener can learn. Instead of buying new plants every season, you take a small piece of a healthy plant — a stem, a leaf, or a root — and grow an identical plant for free.

It sounds simple because it is. Propagation from cuttings works for a huge range of garden plants — herbs, ornamentals, fruit shrubs, houseplants, and even some vegetables. Some plants root directly in water; others need soil and a touch of rooting hormone. Either way, once you understand the basics, the results are surprisingly reliable.

This guide walks you through every method — soil and water propagation, the different cutting types, how to boost success with rooting hormone, the best times of year to take cuttings, and how to troubleshoot when things go wrong.

Categories
Home & Garden

Get Rid of Fruit Flies

Fruit flies seem to appear out of nowhere — circling your kitchen fruit bowl, hovering around your compost bin, or swarming over garden crops. They’re one of the most persistent household and garden pests, and once they take hold, a few flies can become an infestation within days.

In this guide, we cover the most effective methods to get rid of fruit flies — DIY traps you can make in minutes, store-bought solutions, and how to tackle specific problem areas like kitchen drains, home and garden, and outdoor crops. We also cover prevention so they don’t come back.

Categories
Farming

Multiple Cropping & Double Cropping: A Complete Guide

Growing one crop per field per year leaves a lot of potential on the table. Multiple cropping (also called multicropping) is the practice of growing more than one crop on the same piece of land in a single year – either at the same time, in sequence, or in carefully planned rotations.

Multiple cropping is any system that grows two or more crops on the same land in the same year. The main types are double cropping (two crops in sequence on the same plot in one year), intercropping (two or more crops growing together at the same time), relay cropping (planting the next crop before the current one is harvested), and sequential cropping (back-to-back crop cycles with no overlap).

Done well, multicropping lifts yield per acre, spreads weather and market risk, and builds healthier soil. Done badly, it drains nutrients, increases pest pressure, and wears out the land. This guide breaks down the types, the pros and cons, what to plant together, and when double cropping specifically is worth it on a US farm or homestead.

Categories
Farm Animals

Best Small Farm Animals for Beginners: A Complete Guide

Picking the right animals is the single biggest decision a new small farmer or homesteader makes. Get it right and you’re set for years. Get it wrong and you burn out before year two.

The easiest small farm animals for beginners are chickens, rabbits, and honey bees. They take up little space, need modest infrastructure, and produce useful output (eggs, meat, pollination, honey) within weeks or months. Goats, ducks, sheep, pigs, and miniature cattle all work too, but they demand more fencing, more feed, and more time.

This guide ranks the best beginner farm animals by space needs, cost, effort, and profitability, and flags the mistakes first-time owners make. Whether you’ve got a half-acre backyard or a 10-acre homestead, there’s a sensible starting point here.

Categories
Farm Supplies

Best Chicken Feeder: The Right Automatic Feeder to Consider and How to Choose One

The right chicken feeder can make a real difference to your flock’s health, your feed bill, and how often you find yourself chasing spilled grain around the coop. A poorly designed feeder lets chickens scratch feed onto the ground, attracts rodents, and can expose wet feed to mold — all problems that cost money and stress birds out. Getting the feeder right from the start means less waste, a cleaner coop, and a flock that eats at its own pace without competition.

Whether you keep three backyard hens or manage a flock of thirty, there’s a feeder designed to match your setup. From simple gravity-fed hoppers to pest-proof treadle feeders, the options are more varied than you might expect. This guide walks you through what to look for, the different styles available, and our top picks for every flock size — so you can stop guessing and start feeding smarter. If you’re new to keeping chickens, the Farm Animals hub is a great place to start building your knowledge.

Categories
Farming Home & Garden

The Most Profitable Crops to Grow on a Small Farm

Growing a few high-value crops is now a realistic income stream for small-scale farmers and backyard growers across the US. The good news is that you do not need hundreds of acres to make it work. Some of the most profitable crops thrive in tight spaces, and a well-chosen quarter-acre plot can outperform a large commodity field on a per-acre basis.

This guide breaks down the most profitable crops you can grow on a small farm, with updated revenue estimates for 2026 and practical notes on harvest timelines, growing conditions, and where to sell. Whether you are exploring homesteading for the first time or looking for profitable small farm ideas to boost an existing operation, this list will help you decide where to put your effort.


What Makes a Crop Profitable?

Profitability comes down to three things: what the market will pay per pound or unit, how much you can grow per acre, and what it costs to produce. Commodity crops like corn and wheat deliver thin margins because prices are set globally and production is mechanized at industrial scale. Specialty crops flip that equation: lower volume, much higher price per unit, and margins that commodity farming simply cannot match.

Several factors shape whether a specific crop is profitable for your situation:

  • Market price is the single biggest lever. If buyers will pay $20 per pound for gourmet garlic versus $2 for conventional, your revenue per acre changes dramatically.
  • Input costs matter just as much. An expensive fertilizer program or irrigation setup can eat into margins fast, so track every cost carefully.
  • Growing conditions including your climate zone, soil type, and access to water all determine which crops are realistic for your land. A drought year can wipe out an otherwise profitable harvest.
  • Selling channel affects what you can charge. Direct-to-consumer at farmers markets and through CSA subscriptions typically pays 2-3x more than wholesale.

The Most Profitable Crops for Small Farms

Below are the highest-value crops for small and backyard farms, grouped by category. Each entry includes current revenue estimates, harvest timelines, and what to expect if you are starting from scratch. Also check out our guide to the most popular microgreens to grow for another high-profit option.

Herbs and Spices

Herbs and spices consistently rank among the most profitable plants to grow on a small farm. Their high price per pound, low space requirements, and strong consumer demand make them a natural starting point for new growers.

Lavender

Lavender remains one of the most versatile and profitable crops for small acreage. You can sell dried bundles, essential oil, sachets, soaps, and other value-added products. Many successful lavender farms also generate income from agritourism, with visitors paying to walk the fields and buy directly.

Field of purple lavender growing in rows on a small farm
Time from Planting to Harvest

Lavender takes 90 to 200 days to reach its first harvest from seed. However, these plants are slow growers and typically need 2 to 3 years to reach full production maturity. Most growers start with established cuttings or plugs to speed up the timeline.

90 to 200 days to first harvest

Revenue Estimates

An established acre of lavender can generate $10,000 to $30,000 per year from dried bundles and essential oil. Growers who create value-added products (soaps, lotions, culinary blends) or run agritourism events report revenues as high as $75,000 to $120,000 per acre in peak years, though those numbers require significant marketing effort and an established customer base.

$10,000 to $30,000 per acre (dried/oil), up to $120,000 with value-added products

Saffron

Saffron is the world’s most expensive spice by weight. Each delicate stigma must be hand-harvested from the Crocus sativus flower, and it takes roughly 75,000 flowers to produce a single pound of dried saffron. That labor intensity is what keeps the price high and makes it one of the most profitable crops per square foot for patient growers.

Time from Planting to Harvest

Saffron corms are planted in late summer and flower in about six to ten weeks during fall. The plants are perennial, producing larger yields each year as the corms multiply. Expect meaningful harvests by year two or three.

6 to 10 weeks from planting to first flower

Revenue Estimates

Premium-grade saffron sells for $8,000 to $15,000 per kilogram at retail in 2026, with wholesale prices ranging from $2,500 to $3,800 per kilogram depending on grade and certification. A small half-acre plot can yield 1.5 to 2.5 kg annually once established, generating $3,750 to $37,500 depending on whether you sell wholesale or direct to consumers. Organic certification commands the highest premiums.

$8,000 to $15,000 per kilogram retail (2026 pricing)

Gourmet Garlic

Gourmet garlic varieties like Purple Stripe, Rocambole, and Porcelain are not the same as the standard garlic you find at grocery stores. They carry bolder flavors, unique color profiles, and price tags that make them one of the most accessible high-value crops for small farms. The US garlic market is valued at roughly $2.25 billion and growing at about 3.5% annually, so demand is steady.

Time from Planting to Harvest

Garlic is planted in fall and harvested the following summer, so plan on about 8 to 9 months from clove to bulb. Hardneck varieties (the gourmet types) do best in cooler climates with a proper winter chill period.

8 to 9 months from planting to harvest

Revenue Estimates

Gourmet garlic sells for $16 to $25 per pound at farmers markets, compared to $1 to $2 per pound for conventional. A well-managed acre can yield 6,000 to 12,000 pounds, putting gross revenue between $25,000 and $100,000 per acre depending on variety, growing conditions, and sales channel. After subtracting costs, net profit of $15,000 to $80,000 per acre is realistic for established operations.

$25,000 to $100,000 gross revenue per acre


Fruits and Vegetables

High-value fruits and vegetables are among the most profitable crops for small farms, especially when sold direct to consumers. If you are new to growing, start with our guide on why you should grow your own vegetables.

Goji Berries

Goji berries are a superfood packed with antioxidants, vitamins, and minerals. They can be sold fresh, dried, juiced, or added to trail mixes and smoothie blends. Health-conscious consumers continue to drive strong demand for locally grown goji berries, especially organic and pesticide-free options.

Hands holding fresh goji berries harvested from a small farm
Time from Planting to Harvest

Goji shrubs are a long-term investment. They take 2 to 3 years to begin producing fruit and 3 to 5 years to reach full maturity. Once established, however, they produce reliably for 15 to 20 years with minimal maintenance.

2 to 3 years to first fruit, 3 to 5 years to full production

Revenue Estimates

At full maturity, one acre of goji berries can produce around 7,000 pounds of fruit. Dried goji berries sell for $15 to $25 per pound at retail, while fresh berries at farmers markets command even higher prices. Annual revenue of $40,000 to $50,000 per acre is achievable once plants are fully established.

$40,000 to $50,000 estimated revenue per acre at full maturity

Cherry Tomatoes

Cherry tomatoes are a high-value crop that can be grown almost anywhere, including in containers on a patio. You can even grow cherry tomatoes in pots at home. Their fast turnaround and steady demand at farmers markets make them an excellent choice for beginners looking for quick returns.

Time from Seed to Harvest

Cherry tomatoes grow fast. Most varieties are ready to pick within 7 to 8 weeks after transplanting, and plants continue producing for several months through the growing season.

7 to 8 weeks from transplant to harvest

Revenue Estimates

Heirloom and specialty cherry tomatoes sell for $3 to $5 per pint at farmers markets. A productive acre can yield 15,000 to 25,000 pounds per season, with gross revenue of $10,000 to $25,000 depending on variety and sales channel. The real advantage is the fast turnaround, meaning you can plant successive crops and maximize your growing season.

$10,000 to $25,000 per acre per season

Arugula

Arugula is a nutrient-dense salad green with a peppery flavor that restaurants and consumers love. It grows quickly, tolerates cool weather, and does not need much space, making it ideal for small-scale growers.

Time from Seed to Harvest

Plant arugula in early spring or early fall for the best results. You should see harvestable leaves within 4 to 6 weeks of sowing. Because it bolts in hot weather, timing your planting around cooler months gives you the longest harvest window.

4 to 6 weeks from seed to harvest

Revenue Estimates

Arugula sells for roughly $6 to $8 per pound at farmers markets and to restaurants. One acre can yield up to 9,000 pounds per year with successive plantings, putting estimated gross revenue at $54,000 to $72,000 per acre. Even on a small raised bed, arugula provides strong returns relative to the space and effort involved.

$54,000 to $72,000 estimated revenue per acre


Microgreens

Microgreens are young vegetable and herb seedlings harvested just 7 to 14 days after sprouting. They are one of the fastest-growing segments in the specialty produce market and arguably the most profitable crop per square foot that a small grower can produce. You do not even need outdoor land since most microgreen operations run indoors with shelving, trays, and LED grow lights.

Time from Seed to Harvest

Most microgreen varieties are ready to cut in 7 to 14 days from seeding. That rapid cycle means you can turn over the same tray space 20 to 30 times per year, which is what drives the high revenue-per-square-foot numbers.

7 to 14 days per harvest cycle

Revenue Estimates

Microgreens sell for $25 to $50 per pound at farmers markets and to restaurants. Each standard 1020 tray costs about $3 to $5 to produce and can yield $15 to $30 in revenue. A modest 500-square-foot indoor setup with vertical shelving can generate $25,000 to $50,000 per year once you have established a reliable buyer base. The key is securing committed buyers (restaurants, grocery stores, CSA customers) before you scale up production. For a deeper dive, see our guide to the most popular and profitable microgreens.

$25,000 to $50,000 per year from a 500 sq ft indoor setup


Edible Fungi

Gourmet mushrooms are often overlooked, but they are among the most profitable crops per square foot for small farms. Unlike most crops, mushrooms do not require sunlight or large fields. They thrive in climate-controlled indoor spaces, making them perfect for urban growers or anyone with a spare basement, garage, or shipping container.

Gourmet Mushrooms

Oyster mushrooms, lion’s mane, and shiitake are the top sellers in the gourmet mushroom market. Oyster mushrooms are the easiest variety to start with since they grow quickly and tolerate a wide range of conditions. Lion’s mane has surged in popularity thanks to growing consumer interest in functional foods and cognitive health benefits.

Gourmet mushrooms growing on a small farm
Time from Inoculation to Harvest

Most gourmet mushroom varieties produce their first flush within 3 to 4 weeks after inoculation, with the full crop cycle (including spawn preparation) running about 7 to 8 weeks. Indoor growers report better and more consistent yields than outdoor operations.

7 to 8 weeks full crop cycle

Revenue Estimates

Gourmet mushrooms sell for $8 to $15 per pound at retail, with lion’s mane and specialty varieties commanding the highest prices. A small 500-square-foot indoor growing room can produce 12,000 pounds of oyster mushrooms per year, translating to $72,000 to $120,000 in gross revenue. Even after factoring in substrate, energy, and labor costs (which typically consume 35% to 50% of revenue), mushroom farming offers some of the strongest margins in small-scale agriculture.

$72,000 to $120,000 gross revenue from 500 sq ft


Cut Flowers

Cut flower farming has boomed in the US over the past few years, driven by demand for locally grown, seasonal blooms for weddings, events, and direct-to-consumer bouquet subscriptions. Unlike imported flowers, locally grown cuts are fresher, last longer in the vase, and carry a story that buyers value. For small farms with even a quarter-acre of growing space, flowers can be one of the most profitable crops per acre.

Time from Seed to Harvest

Most annual cut flowers (zinnias, sunflowers, cosmos, snapdragons) are ready to harvest 8 to 12 weeks from seeding. Perennials like peonies and dahlias take longer to establish but produce reliably year after year once they are in the ground.

8 to 12 weeks for most annual varieties

Revenue Estimates

Small flower farms report average gross sales of $25,000 to $50,000 per acre, with high-intensity growers reaching $55,000 to $60,000 per acre. Net profit margins of 50% to 60% are common for direct-to-consumer operations selling through farmers markets, flower CSAs, and wedding florists. The most successful small flower farms combine multiple sales channels to keep revenue consistent throughout the growing season.

$25,000 to $50,000 per acre, with 50-60% net margins


Other Profitable Crops Worth Considering

Beyond the crops above, several other options deserve a spot on your shortlist depending on your climate, space, and goals.

Ginseng

American ginseng is one of the highest-value crops you can grow, but it requires patience. The roots need 5 to 6 years to mature before harvest. Once ready, a single acre can generate up to $200,000 when roots, rootlets, and seeds are all factored in. Ginseng grows best in shaded woodland settings, making it a strong option if you have forested land that would otherwise sit unused.

Christmas Trees

Christmas trees are a seasonal but reliable cash crop. Trees take 6 to 10 years from planting to sale, so this is a long game. However, retail prices of $60 to $100+ per tree and the ability to plant 1,000 to 1,500 trees per acre mean that a mature acre can generate $60,000 to $150,000 in a single harvest season. Many tree farms also supplement income with wreaths, garlands, and agritourism experiences. As a secondary benefit, you also get great firewood from trimming and culled trees.

Sugar Crops and Soybeans

If you have more acreage to work with, traditional cash crops like sugar cane, sugar beets, and soybeans still offer solid margins. These require more land and equipment than the specialty crops above, but they benefit from established supply chains and government support programs. Soybeans in particular remain one of the most consistent earners for mid-size operations across the US.


How to Maximize Your Crop Profits

Choosing the right crop is only half the equation. How you grow and sell it matters just as much. Here are a few principles that apply across all of the crops on this list:

  • Sell direct whenever possible. Farmers markets, CSA subscriptions, and direct restaurant sales typically pay 2-3x more than wholesale channels.
  • Start small and validate demand. Grow a test batch before committing a full acre. Make sure buyers exist in your area before you scale.
  • Stack multiple crops. The most profitable small farms often grow 3 to 5 complementary crops rather than betting everything on one.
  • Invest in proper irrigation. Consistent water delivery is one of the biggest factors in yield consistency. See our complete guide to farm irrigation systems for help choosing the right setup.
  • Add value where you can. Drying herbs, making jams, bundling bouquets, or creating ready-to-eat microgreen mixes all increase your revenue per unit.

Conclusion

You do not need a massive farm to earn a meaningful income from growing crops. The most profitable crops for small farms share a few common traits: high price per pound, strong consumer demand, and the ability to grow well in limited space. Lavender, saffron, gourmet garlic, mushrooms, microgreens, and cut flowers all fit that profile.

The best approach is to pick two or three crops that match your climate, available space, and local market demand. Start with a small test plot, find your buyers, and scale from there. Whether you are working a quarter-acre backyard or a dedicated five-acre homestead, the crops on this list offer real earning potential for growers willing to put in the work.

Related: Once you have a profitable crop, consider pairing it with another in a multiple cropping system to get two harvests from the same ground in a single season.

Categories
Farming

What is Permaculture? A Complete Guide to Permaculture Farming and Gardening

Permaculture is one of those words that gets tossed around in farming and gardening circles, but few people can explain exactly what it means or how to put it into practice. At its core, permaculture is a design system for creating agricultural ecosystems that are productive, sustainable, and largely self-maintaining. Instead of fighting nature with chemicals and heavy machinery, you work with natural patterns to build something that feeds you while regenerating the land.

Whether you are planning a backyard garden or mapping out a multi-acre homestead, understanding permaculture principles can save you time, money, and a lot of wasted effort. This guide covers what permaculture is, how its core principles and zones work, and practical steps to start your own permaculture garden.


What is Permaculture?

Permaculture is a design philosophy for building human habitats that mimic the patterns and relationships found in natural ecosystems. The word itself combines “permanent” and “agriculture” and was coined by Australian ecologist Bill Mollison and his student David Holmgren in the late 1970s.

The idea is straightforward: nature has spent billions of years optimizing how ecosystems work. Forests do not need tilling, fertilizing, or pest control, yet they produce massive amounts of biomass year after year. Permaculture takes those natural strategies and applies them to how we grow food, manage water, build soil, and organize our land.

The three ethical pillars of permaculture are:

  1. Care for the earth by protecting soil, water, and biodiversity
  2. Care for people by providing for basic human needs
  3. Fair share by returning surplus to the system and limiting consumption

Recent research backs up the approach. A 2024 study published in Communications Earth & Environment found that permaculture sites showed 27% higher soil carbon stocks than conventional fields, 201% more earthworms, and 457% greater plant species richness. Bird species diversity was nearly three times higher on permaculture land compared to conventional farmland in the same region.

“The Permaculture Principles” by Oregon State University Ecampus on YouTube.

The Core Principles of Permaculture

Permaculture design is guided by a set of principles that apply whether you are working with a quarter-acre backyard or a 50-acre farm. These are the most important ones to understand before you start planning.

Observe and Interact

Before you change anything, spend time watching how your land works. Where does water flow after rain? Which areas get full sun versus shade? Where does frost settle first? A full year of observation before making major changes will save you from costly mistakes. Understanding your land’s natural patterns is the foundation of every good permaculture design.

Catch and Store Energy

This principle is about capturing resources when they are abundant so you can use them during lean times. Practical examples include harvesting rainwater with rain barrels or cisterns, using solar panels for energy, preserving your harvest through canning and drying, and building soil organic matter that holds moisture through dry spells.

Produce No Waste

In a well-designed permaculture system, nothing is wasted because every output becomes an input for something else. Kitchen scraps become compost. Compost feeds the garden. The garden feeds you. Animal manure fertilizes crops. Pruned branches become mulch or firewood. The goal is closed-loop cycles where waste simply does not exist.

Design from Nature

Nature is incredibly efficient, and permaculture design aims to replicate those patterns. Companion planting, where you grow plants together because they benefit each other, is one of the most common applications. For example, the “Three Sisters” guild of corn, beans, and squash has been used by Indigenous farmers for centuries because each plant supports the others.

Integrate Rather than Segregate

In nature, everything is connected. Permaculture design mimics this by placing elements so they support each other. Chickens in the garden eat pests and fertilize the soil. Fruit trees shade heat-sensitive crops underneath. A pond attracts beneficial insects that pollinate your vegetables. When each element serves multiple functions and connects to others, the whole system becomes more resilient than its individual parts.

Use Small and Slow Solutions

Big projects often have unintended consequences. Permaculture encourages starting small, observing the results, and scaling up gradually. Plant a few raised garden beds before converting your whole yard. Try one new technique per season rather than overhauling everything at once. Patience is a core skill in permaculture.

Use Edge Effects

The edges where two ecosystems meet (forest and meadow, land and water, sun and shade) are among the most productive zones in nature. They host more species and more activity than the interior of either system. In permaculture design, you can maximize these edges by creating curved garden beds instead of straight rows, building ponds with irregular shorelines, and planting hedgerows along property boundaries.

Use Biological Resources

Wherever possible, use living systems instead of synthetic inputs. Homemade compost instead of chemical fertilizer. Ducks instead of slug pellets. Nitrogen-fixing cover crops instead of synthetic nitrogen. Biological resources are renewable, self-replicating, and build ecosystem health over time rather than degrading it.


The Five Zones of Permaculture

One of the most practical tools in permaculture design is the zone system. Zones organize your land based on how often you need to visit and interact with each area. Elements that need daily attention go close to the house; those that need little or no maintenance go furthest away. This saves energy, time, and frustration.

Zone 0: The Home

Zone 0 is the house itself, including energy efficiency, water conservation, and waste reduction within the living space. Decisions here (like placing windows for passive solar heating or setting up a kitchen composting station) ripple out into every other zone.

Zone 1: The Kitchen Garden

The area immediately around your home. This is where you put things you interact with daily: herb gardens, salad greens, a small chicken coop for eggs, a worm bin, and seedling nurseries. If you only have a small backyard, Zone 1 might be your entire permaculture system.

Zone 2: The Orchard and Perennials

Semi-intensively managed areas that you visit every few days. Fruit trees, berry bushes, larger vegetable beds, beehives, and small livestock pens typically live here. A proper irrigation system helps keep maintenance manageable in this zone.

Zone 3: The Farm

The main production area for field crops, larger livestock, and staple foods. This zone is managed but less intensively, with visits weekly or as needed. Cover crops, crop rotation, and mulching reduce the need for constant attention. If you are growing profitable crops at any scale, they likely live in Zone 3.

Zone 4: Woodland and Forage

A semi-wild area used for timber, firewood, wild foraging, and free-range grazing. You visit occasionally to harvest or do light management, but the system is mostly self-sustaining.

Zone 5: Wilderness

Completely unmanaged natural area. Zone 5 exists for observation and learning. It is your reference ecosystem, the place where you watch how nature solves problems so you can apply those lessons back in Zones 1 through 4.


Key Permaculture Techniques

Beyond the principles and zones, permaculture uses several specific techniques that you can start applying right away on your farm or in your garden.

Food Forests

A food forest mimics the structure of a natural woodland using seven layers of edible plants: canopy trees (like walnuts or chestnuts), understory trees (like apples or plums), shrubs (like blueberries or currants), herbaceous plants (like comfrey or rhubarb), ground covers (like strawberries or clover), vines (like grapes or kiwi), and root crops (like garlic or potatoes). Once established, a food forest produces food year after year with minimal maintenance.

Plant Guilds

A guild is a group of plants deliberately placed together because they help each other thrive. A classic example is the apple tree guild: the apple tree provides the canopy, comfrey planted beneath it mines deep nutrients and provides mulch when cut, nasturtiums attract beneficial insects, garlic chives repel pests, and clover fixes nitrogen into the soil. Each plant has a job, and together they outperform any single plant growing alone.

Swales and Water Harvesting

A swale is a shallow trench dug along the contour of a slope with a raised berm on the downhill side. When it rains, the swale catches runoff and holds it, allowing the water to slowly soak into the soil rather than washing away. Trees and shrubs planted on the berm benefit from this stored moisture. Over time, swales can make land drought-resistant without any irrigation infrastructure. Combined with rain barrels and roof catchment, water harvesting can dramatically reduce your dependence on external water sources.

Sheet Mulching

Also called lasagna gardening, sheet mulching is a no-dig method for building fertile soil on top of existing ground (even a lawn). You layer cardboard or newspaper over the ground to suppress weeds, then pile on alternating layers of compost, manure, straw, leaves, and other organic matter. Within a few months, you have rich, plantable soil without ever touching a rototiller. It is one of the fastest ways to convert unused land into productive garden space.


Benefits of Permaculture

Why go through the effort of designing a permaculture system when you could just plant a regular garden? Because the returns compound over time in ways that conventional gardening cannot match.

  • Less work over time. Permaculture systems are front-loaded: you invest more effort in the design and setup phase, but once established, they require far less ongoing maintenance than conventional gardens. Perennial plants, self-seeding annuals, and natural pest control all reduce the amount of weekly labor.
  • Better soil health. Research shows permaculture sites have significantly higher soil carbon, lower compaction, and dramatically more earthworm activity. Healthy soil means healthier plants, better water retention, and fewer pest problems.
  • Water efficiency. Between swales, mulching, and strategic plant placement, permaculture systems can reduce water usage by 30% or more compared to conventional approaches. In drought-prone areas, this can be the difference between a harvest and a failed season.
  • Biodiversity. The multi-layered planting approach supports far more species of plants, insects, and birds than monoculture farming. That biodiversity is not just good for the environment; it actively protects your crops by maintaining natural pest predators and pollinators.
  • Resilience. Diverse systems are harder to knock out. If one crop fails, others pick up the slack. If pests target one species, their predators (supported by the broader ecosystem) help keep populations in check.
  • Lower costs. By producing your own compost, saving seeds, harvesting rainwater, and relying on biological pest control, you dramatically reduce the need for purchased inputs over time.

How to Start a Permaculture Garden

Ready to put these ideas into practice? You do not need a lot of land or money to get started. Here is a step-by-step approach that works whether you have a small backyard or several acres.

What you need to get started

Quality topsoil or compost

Organic matter: wood chips, leaves, straw, or green manure crops

A mix of perennial and annual seeds or seedlings

Cardboard or newspaper for sheet mulching

Step 1: Observe Your Site

Spend at least one full season watching your land before you make permanent changes. Map where sunlight falls at different times of day, where water collects or drains, which direction the prevailing wind comes from, and where frost sits longest. Take notes and sketch a rough site map. This observation period is the single most valuable step in the entire process.

Step 2: Set Goals and Create a Design

Decide what you want from your permaculture system. Food production? Wildlife habitat? Both? Then sketch a zone map of your property, placing the most labor-intensive elements (herb garden, salad beds, compost bin) closest to the house and lower-maintenance elements further out. Your design does not need to be perfect. Start with the broad strokes and refine as you learn.

Step 3: Build Your Soil

Healthy soil is the engine of any permaculture system. Start by sheet mulching your planting areas: lay cardboard over existing grass or weeds, then pile on 6 to 12 inches of organic matter (compost, aged manure, leaf mold, straw). This smothers weeds, feeds soil biology, and creates a rich planting medium without any digging. You can also make your own fertilizer from kitchen scraps and garden waste.

Step 4: Choose Your Plants

Select a mix of perennials (fruit trees, berry bushes, herbs) and annuals (vegetables, salad greens) suited to your climate zone. Think in guilds rather than rows: group plants that benefit each other and fill different layers of the canopy. Check our guide to optimizing seeds for different seasons for help with timing.

Step 5: Maintain and Adapt

Permaculture gardens need less maintenance than conventional gardens, but they are not zero-effort. Water regularly during establishment, keep mulch topped up, and observe what is working and what is not. The first year or two will involve the most hands-on time. After that, your system starts doing more of the work for you as perennials mature and soil biology builds.

“Permaculture For Beginners!” by Perma Pastures Farm on YouTube.

Conclusion

Permaculture is not a rigid set of rules. It is a way of thinking about land, food, and resources that works with natural systems instead of against them. The principles are universal, but every permaculture design is unique because every site, climate, and set of goals is different.

If you are just getting started, focus on the basics: observe your land, build your soil, plant diverse species, and start small. A single well-designed garden bed using permaculture principles will teach you more than any book. From there, you can expand zone by zone as your confidence and your soil grow together.

For more on making your homestead productive, check out our guides on growing your own vegetables and the most profitable crops for small farms.


Frequently Asked Questions about Permaculture

What is the concept of permaculture?

Permaculture is a design system for creating agricultural ecosystems that are sustainable and self-sufficient. It is founded on ecological principles and strives to develop productive, effective, and resilient systems. The objective is to satisfy human needs while protecting and regenerating the natural world. Permaculture design principles can be applied to all aspects of human habitation, including food production, housing, energy consumption, waste management, and economic systems.

What is an example of permaculture?

Common examples include food forests with multiple layers of edible plants, backyard gardens using companion planting guilds, rainwater harvesting with swales and rain barrels, sheet mulching to build soil without digging, and integrating chickens into garden systems for pest control and fertilization.

What are the five zones in permaculture?

Permaculture uses six zones (0 through 5) organized by how often you interact with each area. Zone 0 is the home. Zone 1 is the kitchen garden right outside your door. Zone 2 is the orchard and perennial area. Zone 3 is the main farming zone. Zone 4 is semi-wild woodland for foraging and timber. Zone 5 is unmanaged wilderness kept for observation and learning.

What is the difference between agriculture and permaculture?

In conventional agriculture, the land is managed primarily to maximize crop yield using monocultures, heavy machinery, and chemical inputs. Permaculture takes a more holistic approach, designing diverse ecosystems that produce food while regenerating soil, conserving water, and supporting biodiversity. The key difference is that permaculture works with natural patterns rather than overriding them.

How do I start a permaculture garden from scratch?

Start by observing your site for at least one season to understand sun, water, wind, and frost patterns. Then create a simple zone map and design. Build your soil using sheet mulching (cardboard topped with layers of compost and organic matter). Choose a mix of perennial and annual plants suited to your climate, and group them in companion planting guilds. Start small and expand as you learn what works on your land.

How do I turn my lawn into a permaculture garden?

The easiest method is sheet mulching. Lay overlapping cardboard directly on your lawn (no need to remove the grass), then pile on 6 to 12 inches of compost, aged manure, straw, and leaf mold. Within a few months the grass underneath will decompose, leaving you with rich, plantable soil. From there, plant a mix of food-producing perennials and annuals arranged in guilds.

How much does it cost to start a permaculture farm?

Costs vary widely depending on scale. A backyard permaculture garden can be started for under $200 using free cardboard, homemade compost, and seed-saved plants. A larger homestead-scale setup with fruit trees, irrigation, and fencing might run $2,000 to $10,000. Commercial permaculture farms require significantly more investment for land preparation, planting stock, and infrastructure. The good news is that ongoing costs drop substantially once the system is established, since permaculture reduces the need for purchased inputs over time.

Related: Permaculture polycultures overlap heavily with multiple cropping and intercropping – both systems aim to stack more output onto the same piece of land.

Categories
Home & Garden

How to Build Durable Raised Garden Beds for Your Farm

Most home gardeners spend years wrestling with rocky soil, compacted clay, and backs that ache from kneeling at ground level — only to end up with a modest harvest. Raised garden beds solve all three problems at once. They put you in complete control of your soil, your drainage, and your planting depth, and they let you start growing weeks earlier in spring than your neighbors who are still waiting for cold, wet ground to warm up. Whether you have a quarter-acre backyard or a narrow strip of lawn beside a fence, learning how to build raised garden beds is one of the best investments you can make in your home growing setup.

In this guide we’ll walk you through everything you need to know — from choosing materials and sizing your beds to filling them with the right soil mix and planting them out for maximum yield. If you’re just getting started with growing your own food, be sure to check out our guide on why you should grow your own vegetables — it’s a great primer for what raised beds make possible.

  • Why raised beds beat in-ground growing for most home gardeners
  • The best materials to use and what to avoid
  • How to size your beds correctly
  • A complete step-by-step build guide
  • The ideal soil mix for raised beds
  • What to plant and how to maintain your beds year after year