Most home gardeners spend years wrestling with rocky soil, compacted clay, and backs that ache from kneeling at ground level — only to end up with a modest harvest. Raised garden beds solve all three problems at once. They put you in complete control of your soil, your drainage, and your planting depth, and they let you start growing weeks earlier in spring than your neighbors who are still waiting for cold, wet ground to warm up. Whether you have a quarter-acre backyard or a narrow strip of lawn beside a fence, learning how to build raised garden beds is one of the best investments you can make in your home growing setup.
In this guide we’ll walk you through everything you need to know — from choosing materials and sizing your beds to filling them with the right soil mix and planting them out for maximum yield. If you’re just getting started with growing your own food, be sure to check out our guide on why you should grow your own vegetables — it’s a great primer for what raised beds make possible.
- Why raised beds beat in-ground growing for most home gardeners
- The best materials to use and what to avoid
- How to size your beds correctly
- A complete step-by-step build guide
- The ideal soil mix for raised beds
- What to plant and how to maintain your beds year after year
Why Build Raised Garden Beds?
In-ground gardening works, but it asks a lot of you. You have to work around whatever soil you have — heavy clay, sandy loam, or thin topsoil sitting on a layer of hardpan. You’re down on your knees for every task, and every weed seed blown in from the neighborhood lands directly in your growing space. Raised beds change the equation entirely.
Here’s why so many homesteaders and backyard growers make the switch:
- Better drainage. Raised beds sit above ground level, so water moves through the soil profile and away from roots rather than pooling around them. This is a game-changer if your yard has heavy clay.
- No soil compaction. Because you never walk inside the bed, the soil stays light and loose. Roots push through easily, and beneficial organisms like earthworms thrive in undisturbed soil.
- Easier on your back. A bed built 12–18 inches high brings the work surface up toward you, reducing or eliminating kneeling. For older gardeners or anyone with mobility issues, this alone makes raised beds worth every penny.
- Fewer weeds. When you fill a raised bed with clean soil mix, you start with essentially zero weed seeds in the root zone. Weeds that do blow in are easy to spot and pull before they establish.
- Earlier spring planting. The contained soil volume warms up 2–3 weeks faster than ground soil in spring, letting you get seeds in the ground earlier and extend your growing season.
- Better pest control. The defined borders make it easier to add row cover, hoops, or even a simple hardware cloth bottom to deter burrowing pests like gophers and voles.
- Tidy, organized space. Raised beds create structure in a garden. Paths stay clear, beds stay defined, and it’s easy to practice crop rotation season after season.
What Materials Do You Need?
Before you start building, you need to decide what your frame will be made of and gather your tools. The right material depends on your budget, how long you want the bed to last, and the look you’re going for.
Lumber Options
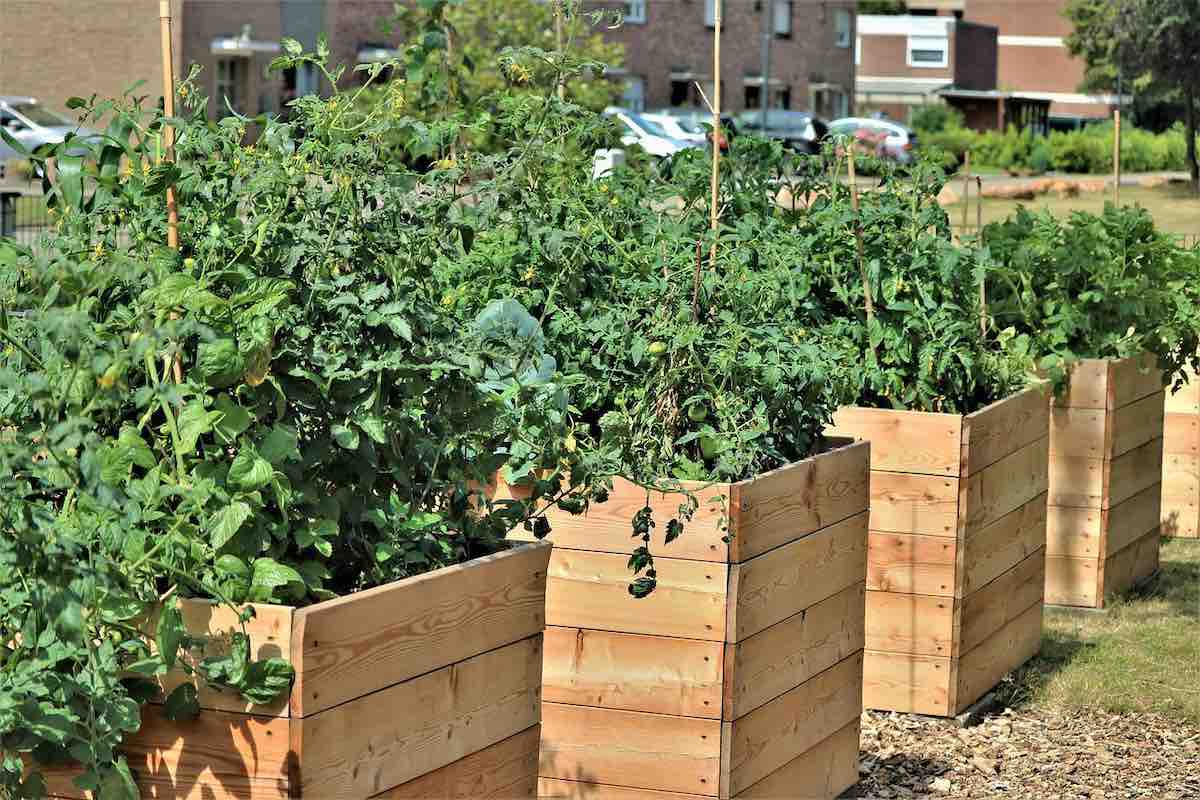
Cedar is the gold standard for wooden raised beds. It’s naturally rot-resistant, insect-resistant, and smells great. A cedar bed can easily last 10–15 years without any treatment. The downside is cost — cedar runs significantly more than standard pine.
Redwood offers similar longevity to cedar and looks beautiful, but it’s more expensive and harder to find outside the western US.
Douglas fir or pine is the budget-friendly option. Untreated pine will last 3–5 years in soil contact before rot sets in. It’s a perfectly reasonable starting point if you want to try raised beds before committing to a more permanent build.
Composite lumber (made from recycled wood fiber and plastic) is rot-proof and long-lasting. It costs more upfront but essentially never needs replacing. Some gardeners find the look less natural, but it’s a solid choice for longevity.
Cinder blocks or concrete are about as durable as you can get. They’re inexpensive, easy to stack without any tools, and the hollow cells can even be planted with herbs or strawberries. The downside is that concrete can slowly raise soil pH over time.
Galvanized metal (corrugated steel panels or metal kits) has become increasingly popular. Metal beds heat up quickly in spring, look sharp in a modern garden, and will outlast any wood option by decades. They do get hot in full sun in very warm climates, but the soil inside generally stays within safe root-temperature range.
Tools You’ll Need
- Tape measure
- Circular saw or hand saw (to cut lumber to length)
- Cordless drill and drill bits
- 3-inch exterior-grade deck screws (or galvanized screws)
- Level
- Landscape fabric or hardware cloth (for the base)
- Shovel or spade
- Square or speed square for corner angles
What Size Should Your Raised Bed Be?
Getting the dimensions right makes the difference between a bed you’ll love and one you’ll find frustrating. There are two dimensions that really matter: width and depth.
Width: stick to 4 feet maximum. The classic raised bed rule is that you should be able to reach the center of the bed from either side without stepping into it. For most adults, that’s a reach of about 2 feet, which means a 4-foot-wide bed is accessible from both sides. If the bed is against a fence or wall and you can only access it from one side, keep it to 2–2.5 feet wide.
Length: as long as you like. The most common sizes are 4×8 feet and 4×4 feet. Longer beds give you more growing space but require more materials. If you’re building multiple beds, 4×8 is a great standard — it uses full 8-foot lumber boards without any waste.
Depth: at least 6 inches, ideally 12 inches. Six inches of quality soil is the bare minimum for shallow-rooted crops like lettuce, herbs, and radishes. For most vegetables — tomatoes, peppers, carrots, beans — you want 12 inches. Deeper beds also dry out more slowly and give you more buffering capacity. If you’re building accessible beds for someone who uses a wheelchair or has difficulty kneeling, 24–30 inches of height puts the work surface at a comfortable standing level.
Step-by-Step Build Guide
Building a standard 4×8 foot raised bed from 2×10 lumber is a weekend project that takes a few hours from start to fill. Here’s the complete process.
Step 1: Choose Your Location
Most vegetables need at least 6 hours of direct sunlight per day — 8 hours is better. Walk your yard at different times of day and observe where the sun falls. Avoid placing beds directly under large trees, which create shade and have aggressive roots that will compete for water and nutrients. Level ground is ideal; a slight slope is fine, but a steep grade will require terracing or you’ll lose water and soil to runoff. Proximity to a water source matters too — you’ll be out there with a hose or watering can regularly, so the closer the better.
Step 2: Measure and Mark the Area
Use stakes and string to mark out your bed footprint before you cut anything. This lets you visualize the space and make sure you have comfortable walking paths (at least 18–24 inches) between beds if you’re building multiple. Remove any grass or weeds inside the marked area — you don’t need to dig them out; just lay them flat. They’ll compost down under the soil.
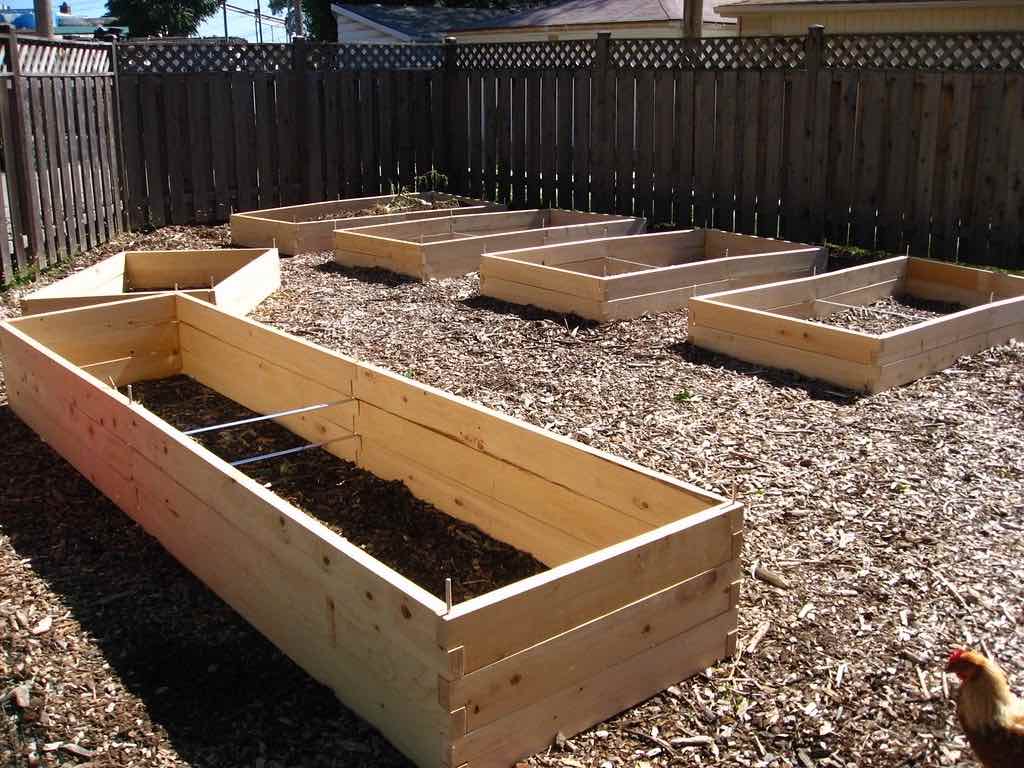
Step 3: Cut Lumber to Size
For a 4×8 bed using 2×10 lumber, you need two 8-foot boards (the long sides) and two 4-foot boards (the short sides). If you want extra height — say a 20-inch deep bed — buy wider boards or double up two layers of standard boards. Mark your cuts carefully with a pencil and square before cutting. Pre-drill pilot holes near the ends of each board to prevent splitting when you screw them together.
Step 4: Assemble the Frame
The simplest corner joint for a raised bed has the short end boards butting up against the inside face of the long side boards. Clamp or hold the corner together, pre-drill through the side board into the end grain of the short board, and drive two or three 3-inch screws per corner. For extra rigidity — especially on longer beds — cut 4×4 inch corner posts about 2 inches taller than your board height, and screw the side boards to the posts. The extra length of the corner post can be driven 2–3 inches into the ground to keep the bed from shifting.
Step 5: Add a Weed Barrier
Line the bottom of the bed with landscape fabric before placing it on the ground. This suppresses weeds pushing up from below while still allowing drainage and beneficial organisms to pass through. If burrowing pests like gophers are common in your area, use hardware cloth (1/4-inch or 1/2-inch mesh) stapled or wired to the frame bottom instead — it’s more effective and still allows drainage. Do not use plastic sheeting, which blocks drainage and kills soil life.
Step 6: Fill with Soil Mix
This is where most people either get it right or set themselves back for the season. Fill your bed with a custom mix (detailed in the next section), not bags of cheap topsoil. Fill the bed to within 1–2 inches of the top, water it thoroughly to settle the soil, and top it off again. Soil will compress noticeably after the first watering.
Step 7: Plant and Mulch
Once the bed is filled and settled, you’re ready to plant. After transplanting seedlings or sowing seeds, add a 2–3 inch layer of organic mulch — straw, shredded leaves, or wood chips — over the surface. Mulch keeps moisture in, soil temperature stable, and surface weeds suppressed. It also gradually breaks down and adds organic matter to the bed. If you’re growing from seed, hold off on heavy mulch until seedlings are a few inches tall so they have room to push through. For a great visual reference on getting started, our guide on how to start a homestead covers the bigger picture of building your growing setup.
Best Soil Mix for Raised Beds
This is one of the most important decisions you’ll make. The soil in your raised bed does not need to be — and should not be — the same soil that’s in your yard. Native garden soil is typically too heavy, too compacted, or too variable in quality to fill a raised bed successfully. Here’s what to use instead.
The classic “Mel’s Mix” from Square Foot Gardening has been the go-to recipe for raised beds for decades: one-third vermiculite, one-third coarse perlite, and one-third blended compost. It’s light, well-draining, nutrient-rich, and never compacts. Once your bed is filled, what you plant next to what matters too — see our companion planting chart for pairings that help each other thrive. The downside is cost — vermiculite and perlite aren’t cheap when you’re filling a 4×8 bed.
A practical everyday mix that most gardeners use successfully:
- 60% quality topsoil — from a landscape supply yard, not bagged “garden soil” from the big box store, which is often low-quality and high in peat that can dry to a hydrophobic crust.
- 30% compost — well-aged compost adds slow-release nutrients, beneficial microbes, and organic matter that supports healthy root development. You can use homemade compost (see our guide on making your own fertilizer) or commercial bagged compost.
- 10% perlite or coarse sand — improves drainage and keeps the mix from packing down over time.
You can also buy pre-blended “raised bed mix” from garden centers — see our garden soil buying guide for how to tell a good bag from a bad one. Look for a product that lists compost, topsoil, and aeration material (perlite, bark fines, or pumice) in the ingredients. Avoid anything that’s mostly peat moss, which is acidic and poor in nutrients on its own.
What to Plant in Raised Beds
Almost any vegetable, herb, or small fruit does well in a raised bed. Here’s a quick overview of what thrives and what’s better left in the ground.
Vegetables
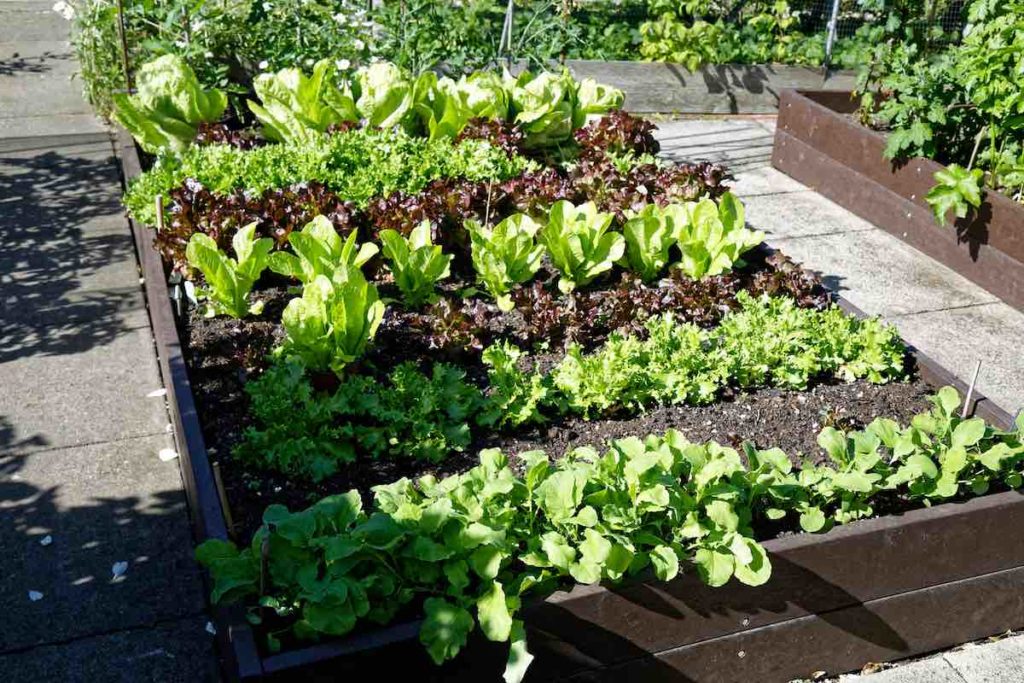
Raised beds are ideal for tomatoes, peppers, cucumbers, zucchini, lettuce, spinach, kale, beans, beets, carrots (in a deep bed of at least 12 inches), and radishes. If you’re trying cherry tomatoes in containers, that same approach scales perfectly to a deep raised bed where the confined root zone produces very concentrated flavor. Most salad greens and brassicas (broccoli, cabbage, kale) are especially well-suited to raised beds because the improved drainage reduces club root and other soil-borne diseases.
Herbs
Basil, cilantro, parsley, chives, thyme, oregano, and sage all do extremely well in raised beds. Be careful with perennial herbs like mint — they spread aggressively and are best kept in a dedicated bed or container within the bed so they don’t take over.
Strawberries and Small Fruits
Strawberries are one of the best plants for raised beds. They love the warm, well-drained soil and produce abundantly. You can fit 8–12 plants in a 4×4 bed. Blueberries require acidic soil (pH 4.5–5.5), so they can work in a raised bed if you adjust the pH — fill the bed with an acidic mix and mulch heavily with pine bark.
What’s Better in the Ground
Large sprawling crops like winter squash, pumpkins, and sweet corn are possible in raised beds but tend to take over the space. They’re more efficiently grown in open ground. Similarly, large fruit trees and perennial shrubs don’t belong in raised beds — the restricted soil volume can stress their roots over time.
Microgreens are another great option if you have limited space — check out our guide to the most popular microgreens to grow for quick, high-yield crops that work beautifully in a shallow raised bed or even a tray on a deck.
Raised Bed Maintenance Tips
Once your raised beds are built and planted, keeping them productive year after year is straightforward with a few regular tasks.
Watering
Raised beds dry out faster than in-ground gardens because they have more exposed surface area and better drainage. Plan to water more frequently — daily in hot weather for shallow-rooted crops, every 2–3 days for deep-rooted plants. Drip irrigation or soaker hoses on a timer are worth the investment if you have multiple beds. They deliver water directly to the root zone, reducing leaf wetness and fungal disease. For a deeper dive into irrigation options, our complete guide to farm irrigation systems covers the full range of options from drip to overhead.
Topping Up Soil Each Year
Soil level drops a couple of inches each season as organic matter breaks down — making your own is easy if you follow our guide to starting composting. Before planting each spring, top up the bed with 1–2 inches of fresh compost. This replenishes nutrients, adds organic matter, and keeps the bed full. You don’t need to dig it in — earthworms and soil organisms will incorporate it naturally over the season.
Crop Rotation
Move plant families around the bed (or between beds) each season. Don’t plant tomatoes, peppers, or eggplant in the same spot two years in a row — they share pest and disease pressures. Rotating also prevents specific soil nutrients from becoming depleted in one zone. A simple rotation: tomato family → brassicas → legumes → root vegetables → back to tomato family.
Covering in Winter
At the end of the growing season, don’t leave beds bare. A bare soil surface loses organic matter to wind erosion and gets compacted by rain. Plant a cover crop (winter rye, clover, or hairy vetch), or simply spread a 3–4 inch layer of shredded leaves, straw, or wood chip mulch over the surface. In spring, you’ll have a well-protected bed ready to plant into with minimal prep. Understanding how to optimize your garden for different seasons helps you make the most of your beds all year long.
Frequently Asked Questions
For most vegetables, aim for at least 12 inches of soil depth. Shallow-rooted crops like lettuce, herbs, and radishes can get by with 6 inches, but deeper beds give all plants more root room, better moisture retention, and more buffering capacity during heat waves. If you’re growing carrots or parsnips, go for at least 12–15 inches.
Cedar is the best all-round choice — it’s naturally rot-resistant, long-lasting, and safe for food gardens. Redwood is equally good if you can find it. Untreated pine or fir works on a budget but will start to rot within 3–5 years in contact with moist soil. Avoid creosote-treated railroad ties or old pressure-treated lumber (CCA-treated), which can leach chemicals into the soil.
Yes — line the bottom with landscape fabric to suppress weeds growing up from below, while still allowing drainage and earthworm access. If gophers or moles are a problem in your area, use hardware cloth (1/4-inch mesh) instead. Never use solid plastic sheeting, which blocks drainage and destroys soil life.
A basic 4×8 foot raised bed built with untreated pine (2×10 boards) costs around $30–$60 in lumber plus another $50–$150 to fill with quality soil mix, depending on your location and what you buy. A cedar version of the same bed will run $80–$150 for the wood. Metal raised bed kits typically cost $80–$200 and include all hardware. Budget more for a deeper or larger bed.
Modern ACQ (alkaline copper quaternary) pressure-treated lumber — the green-tinted wood sold today — is considered safe for raised bed use by most extension services and the EPA for vegetable gardens. However, many gardeners prefer to avoid it entirely and stick with cedar, composite lumber, or metal. Never use old brown CCA-treated lumber or railroad ties treated with creosote, which can leach harmful chemicals.
Cedar is the best wood option for its balance of durability, safety, and cost. For the longest lifespan with zero maintenance, galvanized corrugated steel or composite lumber are excellent choices. Cinder blocks are the cheapest and most durable option but can affect soil pH over time.
Ready to Build?
Building raised garden beds is one of those projects that pays dividends for years. The initial weekend of work — cutting boards, assembling corners, filling with good soil — sets you up with a growing space that’s more productive, easier to manage, and more enjoyable to work in than anything you can get from in-ground gardening. Start with one 4×8 bed, fill it with a quality soil mix, and see what grows. Most people build another one within the same season. Once you see what good drainage and a well-prepped root zone can do for a tomato plant or a row of carrots, you’ll understand why raised beds are the heart of so many backyard home and garden setups.
2 replies on “How to Build Durable Raised Garden Beds for Your Farm”
[…] can quickly turn leaves, branches, and other organic matter into a fine mulch that you can use on the flower beds or over winter crops like kale, cabbage, and […]
[…] microgreens grow best outdoors in containers or beds and can be harvested in 7-14 […]